# nodl OG quick start guide (old)
Applies to:
nodl "OG"
# Thank you for purchasing our product!
Below are a few instructions to help you setup the device.
# What’s in the box?
- The nodl
- A power supply (model may vary depending on your region)
- A blue USB 3 type A to type A cable (aka “fast sync” cable)
- A small white USB type A to micro USB (you can use if for powering a ColdCard for example, they like short wires!)
- An Ethernet cable
- Some stickers and/or other stuff
# Step 1: Connecting all the things & powering on
Your network has to have an available Ethernet port and run DHCP (automatic address assignment). This is most probably the case.
- Connect the Ethernet wire to your router or switch and to the nodl. If you don’t like the length, color or both, you can use any wire you have.
You can optionally replace the small “USB” marked bridge on the back of the device by the blue USB 3 “fast sync” cable. It will slightly improve the speed between the main board and the SSD inside the nodl. Useful if you have a fast Internet connection but not mandatory.
Connect the power supply to the nodl.
Press the button. The blinkenlichts should start, well, blinking.
# Step 2: Setting the password
Point your favorite browser to http://nodl.local:8338/ (opens new window)
If you're running Windows (shit happens), you may have to go to your router's web interface to find nodl's IP address and use http://ipaddress:8338/ instead.
Click on the nodl logo.
Enter a password (twice). The only requirement is the length (8 characters minimum) but use something strong as this password will allow you to reveal the connection information for the lightning node (and allow to transfer funds out of it).
Click on “click here”, you should see the status page with application tiles.
# Step 3: Installing bitcoind and lnd
On the status screen, enter the password defined at step 2 in the password field on top.
Click on “Schedule update” to make sure you’re running the latest software.
After the update is done (you’ll know because the button will be back), click on the “schedule install” button on the bitcoind tile.
After some time, you should see a “start service” button.
Do the same with lnd (if you want to run lnd, that is, but who doesn't) and Ride The Lightning.
# Additional optional and recommended steps
# Connect Zap Desktop and Joule
Once lnd is installed, instructions for connecting Zap Desktop and Joule will automagically appear on in the lnd tile on the nodl interface.
# Optional: Install BTCPay Server
After your nodl is fully synced, you can proceed with installing BTCPay using the same method. BTCPay is built from source and it takes some time (up to 20 minutes).
# Recommended: Join our support channel on Telegram or Slack or both
# Appreciated: Shill the nodl on twitter
Take a picture and tag our Twitter account 😃
# Recommended: Set the SSH password
The nodl has a default (and very insecure) ssh password. Any person connected to your local network can connect to the device as an administrator and break something (or steal the contents of your lightning node).
This will be possible through the web interface in the near future, but for now you have to use a SSH client to change the password.
On Linux/MacOS/Unix, you can use the “ssh” command:
ssh root@nodl.local
On Windows, you can use putty.
The default password is “nodl1234”.
Once connected to the device, type
passwd
then enter your new password (twice).
Then change the install account password by running
passwd install
and entering your new password (twice).
You can use the same password for both accounts.
WARNING WARNING WARNING You need to remember at least either the SSH password, either the web interface password. Without one of them, resetting passwords to regain access to your device will be difficult (but not impossible). WARNING WARNING WARNING
# Recommended: Keeping the software up to date
For privacy reasons, we don’t push updates and there is no auto-update mechanism. It’s up to you to keep your nodl updated by pressing the “Schedule update” button from time to time.
The nodl will then retrieve the latest software from a git repository and run its update script.
# Optional: Make it turn on automatically after a power outage
If you want, you can set the nodl to power on automatically when power is applied instead of having to press the button.
Disconnect all the wires and the USB bridge (if installed).
Remove the four black screws on the back of the device.
Carefully remove the top cover. The small fan has a short wire, be careful to not pull on it. You can disconnect it if you want.
Set the “auto on” jumper according to this picture.
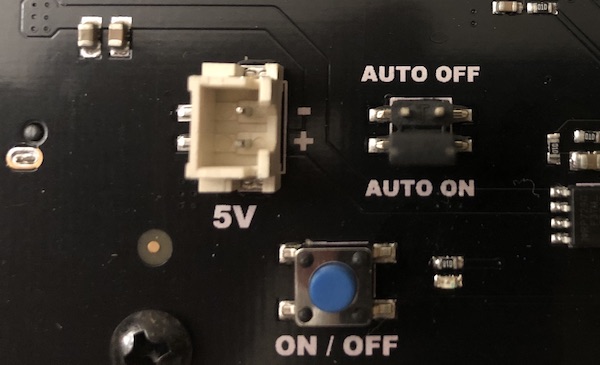
Put the cover back again.
Put the four screws back (it’s easier if you plug back the USB bridge before screwing).
Reconnect all the wires (finishing with the power supply), the nodl should turn on.
#Happy nodl-ing !